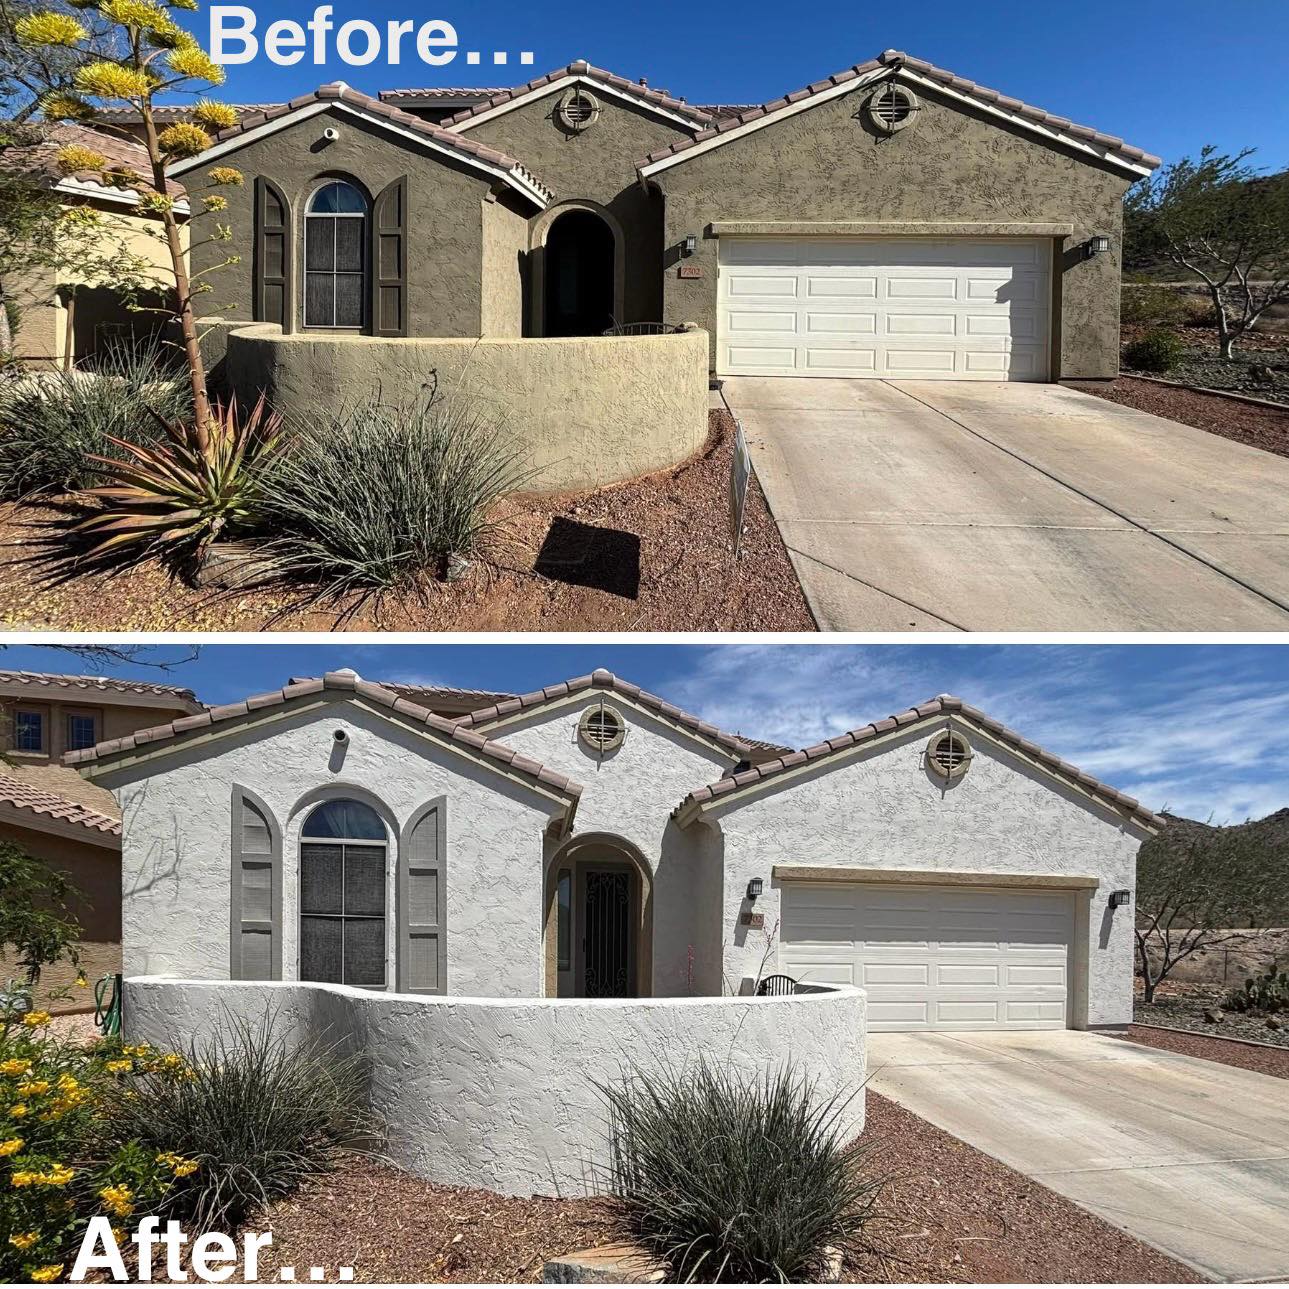
Painting your home is one of the most impactful ways to enhance its appearance, protect it from the elements, and boost property value. But before that first coat of paint touches the surface, proper preparation is key. Especially in Glendale, AZ, where the climate poses unique challenges from high temperatures and sun exposure to occasional dust storms meticulous prep work ensures your paint job lasts longer and looks better. Whether you’re tackling the interior or exterior of your home, here’s a detailed guide on how to properly prepare your house for painting.
Preparing for Interior Painting
1. Start with a Clean Slate
The first step is always to clear out the space. Remove as much furniture as possible from the room. If some items are too large or heavy to move, push them to the center of the room and cover them with plastic sheeting or drop cloths. This protects them from dust and accidental paint splatters.
Don’t forget the smaller details. Take down any wall hangings, decorative items, and curtains. Unplug electronics and cover appliances with plastic sheeting or old sheets to keep them safe from dust and paint. The goal is to create a clutter free workspace where painters can move easily and safely.
2. Protect Floors and Fixtures
Covering your flooring is essential. Use canvas drop cloths or heavy-duty plastic to shield your floors from paint spills and dust. Secure the edges with painter’s tape to prevent tripping or bunching up. Also, use painter’s tape to mask off baseboards, window frames, outlets, and other fixtures. This ensures clean paint lines and keeps your trim and hardware protected.
3. Clean the Walls
Arizona’s dry and dusty climate means your walls may have accumulated more dirt and dust than you realize. Use a sponge or cloth with mild soap and water to scrub down the walls. Pay extra attention to high traffic areas, kitchens, and bathrooms where grease or grime may be present. Once the walls are clean, rinse with plain water and let them dry completely.
4. Repair and Sand
Inspect every wall for imperfections. Fill in holes and cracks with spackle or patching compound. Once dry, sand the patched areas until smooth. If the wall has glossy paint, give it a light sanding to create a slightly rough surface, which helps the new paint adhere better.
After sanding, wipe down all surfaces with a damp cloth or tack cloth to remove the sanding dust. This step is often skipped, but it’s crucial for achieving a flawless finish.
5. Prime Where Needed
Priming isn’t always necessary, but in many cases, it’s strongly recommended especially if you’re painting over dark colors, repairing damaged sections, or switching from a glossy to a matte finish. Primer helps the paint bond better and ensures a more even appearance. In the dry Glendale climate, using a quality primer can also help seal porous walls and reduce the number of topcoats required.
Preparing for Exterior Painting
1. Clean Thoroughly with Power Washing
In Glendale’s desert environment, exterior surfaces often collect dirt, dust, pollen, and even mold in shady spots. Power washing is the most effective way to clean the entire exterior, from stucco and siding to trim and fascia. Be sure to remove cobwebs, bird droppings, and other debris as well. This creates a clean surface so that paint can adhere properly and last longer.
2. Clear the Surrounding Area
Trim back bushes, trees, and shrubs that are close to the house. This provides space for painters and prevents foliage from brushing against freshly painted surfaces. Also, move or cover items like garden furniture, grills, and potted plants to protect them from overspray.
3. Inspect and Repair Surfaces
Glendale homes often have stucco exteriors, which can crack over time due to heat and settling. Fill these cracks with an appropriate filler or elastomeric caulk. For wooden surfaces, replace any rotted or damaged boards. Make sure all surfaces are dry and structurally sound before proceeding.
4. Sand and Scrape Peeling Paint
Use a paint scraper or wire brush to remove any flaking or peeling paint. Sand down rough spots to ensure a smooth transition between old paint and bare areas. For best results, follow up with a sanding sponge or orbital sander to even out surfaces.
5. Caulk Gaps and Joints
Seal any gaps around doors, windows, and trim with high quality exterior caulk. This step prevents moisture intrusion and enhances the insulation of your home. Be sure to allow the caulk to cure fully before painting over it.
6. Prime Where Appropriate
Apply primer to bare wood, repaired patches, or any area where the old paint was completely removed. Primer not only helps the new paint adhere better but also blocks stains and enhances the durability of the final coat. In Glendale’s sunny climate, using a UV resistant primer is a smart move to prevent premature fading.
Final Touches Before Painting Begins
Before the painting crew arrives or you begin the work yourself, double check that all areas are clean, dry, and fully prepped. Make sure the house is clutter free, with tools and materials organized in a nearby staging area. If you’re hiring professionals, this helps them start immediately and work more efficiently.
Weather is another critical consideration in Glendale. Choose a time with mild temperatures and low humidity early spring and fall are usually ideal. Avoid painting during monsoon season or during periods of extreme heat, as both conditions can affect paint drying times and overall results.
Ready to Paint? Let’s Bring Your Vision to Life!
Preparing your home for painting in Glendale, AZ, requires a little extra care due to the region’s dry, dusty conditions and intense sunlight. But with the right preparation, your home will be ready to shine with a fresh coat of vibrant, long-lasting paint. Whether it’s an interior makeover or an exterior refresh, these steps lay the foundation for a stunning and durable finish.
Thinking about giving your home a new look? Don’t do it alone let the pros at Butcher’s Custom Painting handle the prep and painting with precision and care. Contact us today for a free estimate and see how easy it can be to transform your space. Let’s make your home the best-looking house on the block!
Frequently Asked Questions About House Painting
Selecting the perfect paint color involves considering the room’s lighting, existing décor, and the mood you wish to create. It’s advisable to test paint samples on your walls and observe them at different times of the day to see how lighting affects the color.
While it’s possible to paint over wallpaper, it’s generally recommended to remove it for the best results. Painting over wallpaper can lead to peeling and uneven surfaces over time. If removal isn’t feasible, ensure the wallpaper is firmly adhered, clean, and primed before painting.
Priming is essential when painting over dark colors, stained surfaces, or new drywall. A primer ensures better paint adhesion, uniform color, and can prevent stains from bleeding through the topcoat.
The drying time between coats varies based on the type of paint and environmental conditions. Generally, it’s recommended to wait at least 24 hours between coats. Always refer to the manufacturer’s instructions for specific guidance.
Regularly dust and clean walls with a soft cloth or sponge. Address stains promptly using mild soap and water. Avoid harsh chemicals that can damage the paint finish.
Exterior paints are formulated to withstand weather conditions, UV rays, and temperature fluctuations. Interior paints focus on durability against scuffs and stains and often have lower VOC levels for indoor air quality.
Homes built before 1978 may contain lead-based paint. If you suspect lead paint, it’s crucial to hire certified professionals to test and, if necessary, remove it safely. Disturbing lead paint without proper precautions can pose serious health risks.
Ensure surfaces are clean, dry, and properly primed before painting. Avoid painting in high humidity or direct sunlight. Applying paint too thickly or over dirty surfaces can lead to peeling and bubbling.